The following describes the process of starting a new inspection in RV Scribeware. The screenshots will show the process of setting up an RV inspection using the desktop Scribeware application.
New Inspection with RV Template
Once you have installed the RV template and library, you can select the template by selecting ”Create from template…’ This will bring up a list of inspection templates on your system. Select the one that starts with ‘RV Inspections’.
Adding Customer Information
Once the template is selected, you should be on the Client/Property page. The next step is to enter the client’s information: Client Name, Client Email, Client Phone, and Property Address.

Adding the Coach Year-Make-Model-VIN Information
The contracts, which are available on request, are configured to use the ‘Agent Name’ field for the coach’s Year-Make-Model and VIN information.

Adding Inspection Date and Time
On the left side of the ‘Client/Property Information’ screen add the date and time of the inspection in the ‘Inspection Date’ field.
Adding BoilerPlate, Service, and Pricing
On the right side of the ‘Client/Property Information’ screen select the ‘NRVIA Intro’ boilerplate and enter the ‘Invoice Items’; service and pricing.

Select the Contract Agreements
Select the applicable contract agreements and then select the arrow to the right to send the agreements. The agreements shown below are available after reading the Terms and Conditions and sending a request to info@RVScribeware.

Practice Using the Mobile App
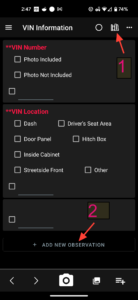
There are two methods to create an observation on the mobile Scribeware app: 1) Select the book-like icon on the upper right of the app (see Figure 1-1); this will pull up a list of observations that come from the RVScribeware library. 2) Select the ‘+ Add New Observation’ on the lower part of the screen (see Figure 1-2).

